ZetaMercier
Usuario (España)

Acá les dejo una lista de claves o comandos para la opción ejecutar:1. Controles de accesibilidad - access.cpl2. Asistente para accesibilidad - accwiz3. Asistente para agregar hardware - hdwwiz.cpl4. Agregar o quitar programas - appwiz.cpl5. Herramientas administrativas - admintools control6. Actualizaciones automáticas - wuaucpl.cpl7. Asistente para transferencia de Bluetooth - fsquirt8. Calculadora - calc9. Administrador de certificados - certmgr.msc10. Mapa de caracteres - charmap11. Compruebe la Utilidad de Discos - chkdsk12. Visor del Portapapeles - clipbrd13. Símbolo del sistema - cmd14. Servicios de componentes - dcomcnfg15. Administración de equipos - compmgmt.msc16. Panel de control - el control17. Propiedades de fecha y hora - timedate.cpl18. Las acciones DDE - ddeshare19. Administrador de dispositivos - devmgmt.msc20. Direct X Troubleshooter - dxdiag21. Disk Cleanup Utility - cleanmgr22. Desfragmentar disco - dfrg.msc23. Disco - diskmgmt.msc24. Disco Partition Manager - diskpart25. Propiedades de pantalla - el control de escritorio26. Propiedades de pantalla - desk.cpl27. Dr. Watson Utilidad para solucionar problemas del sistema - drwtsn3228. El comprobador de controladores para uso general - verificador29. Visor de sucesos - eventvwr.msc30. Transferencia de archivos y configuraciones de herramientas - migwiz31. Archivo herramienta de verificación de firma - sigverif32. Búsqueda rápida - findfast.cpl33. Firefox - fuego34. Carpetas Propiedades - carpetas de control35. Fuentes - Fuentes de control36. Carpeta Fuentes - Fuentes37. Free Cell Card Game - Carta Blanca38. Dispositivos de juego - joy.cpl39. Editor de directivas de grupo (para XP Professional) - gpedit.msc40. Tarjeta de Corazones Juegos - mshearts41. Ayuda y soporte técnico - HelpCtr42. HyperTerminal - hypertrm43. Iexpress Wizard - IExpress44. Servicio de Index Server - ciadv.msc45. Asistente para la conexión a Internet - ICWCONN146. Internet Explorer - iexplore47. Propiedades de Internet - inetcpl.cpl48. Propiedades del teclado - teclado de control49. Configuración de seguridad local - secpol.msc50. Usuarios y grupos locales - lusrmgr.msc51. Registros usted fuera de Windows - cierre de sesión52. Herramienta de eliminación de software malintencionado - MRT53. Microsoft Chat - winchat54. Microsoft Movie Maker - Moviemk55. Microsoft Paint - mspaint56. Microsoft Sincronización Herramienta - mobsync57. Buscaminas Juegos - winmine58. Propiedades del ratón - control del ratón59. Propiedades de Mouse - main.cpl60. Netmeeting - conf61. Conexiones de red - netconnections control62. Conexiones de red - ncpa.cpl63. Asistente para la instalación de red - netsetup.cpl64. Bloc de notas - Bloc de Notas65. Empaquetador de objetos - envasador66. Administrador de orígenes de datos ODBC - odbccp32.cpl67. El teclado de pantalla - osk68. Outlook Express - msimn69. Pintura - PBRUSH70. Contraseña Propiedades - password.cpl71. Monitor de rendimiento - Perfmon.msc72. Monitor de rendimiento - Perfmon73. Opciones de teléfono y módem - telephon.cpl74. Marcador de teléfono - marcador75. Pinball Game - pinball76. Configuración de la alimentación - powercfg.cpl77. Impresoras y faxes - Impresoras de control78. Carpeta Impresoras - Impresoras79. Configuración regional - intl.cpl80. Editor del Registro - regedit81. Editor del Registro - regedit3282. Acceso Remoto Agenda - Rasphone83. Escritorio remoto - mstsc84. Medios de almacenamiento extraíbles - ntmsmgr.msc85. Medios de almacenamiento extraíbles operador Pide - ntmsoprq.msc86. Conjunto resultante de directivas (xp profesional) - rsop.msc87. Escáneres y cámaras - sticpl.cpl88. Tareas programadas - control schedtasks89. Centro de seguridad - Wscui.cpl90. Servicios - services.msc91. Carpetas compartidas - fsmgmt.msc92. Se cierra Windows - apagado93. Sonido y audio - mmsys.cpl94. Spider Solitare Card Game - spider95. Configuración de clientes SQL - cliconfg96. Editor de configuración del sistema - sysedit97. Utilidad de configuración del sistema - msconfig98. Información del sistema - msinfo3299. Propiedades del sistema - sysdm.cpl100. Administrador de tareas - taskmgr101. Probador de TCP TCPTest -102. Cliente Telnet - Telnet103. Administración de cuentas de usuario - nusrmgr.cpl104. Administrador de utilidades - Utilman105. Libreta de direcciones de Windows - wab106. Windows Address Book Import Utility - wabmig107. Windows Explorer - Explorador de108. Firewall de Windows - firewall.cpl109. Windows Magnifier - ampliar110. Infraestructura de administración de Windows - wmimgmt.msc111. Windows Media Player - wmplaye

Termita.Usted sabe que están ahí cuando aparecen agujeros en su sweater favorito, pero no los puede ver. Son millones de bichos que se esconden en sus armarios, anidan en su alfombra y se burlan de sus potes de comida.Escarabajo de la madera.Estas ampliaciones de 150x en 3D muestran a los insectos que abundan por todas la casas .Escarabajo de la alfombra.Cucaracha alemana.Polilla
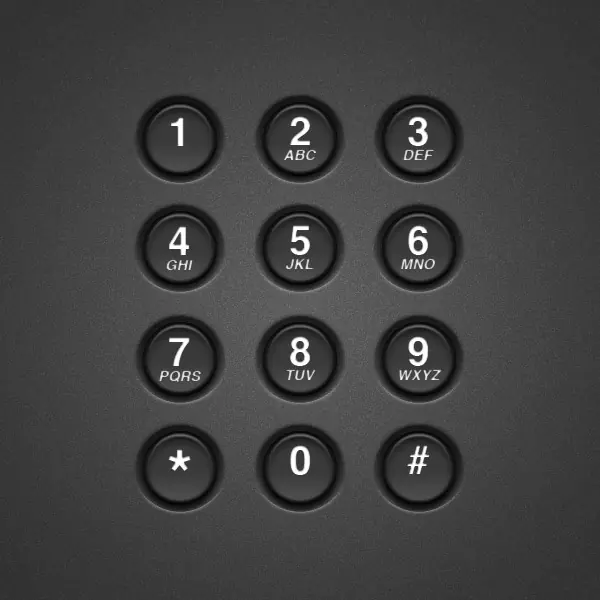
Creating real-world objects in Photoshop can be somewhat challenging. The key is to pinpoint and accentuate small details such as shadows, lighting, and extruding edges. In this tutorial, you’ll learn how to achieve acutely life-like telephone dial buttons in Photoshop using shape layers and layer styles!Step 1Let’s start with a new document in Photoshop at 600×600 pixels.Step 2Let’s create the keypad’s background. Start by creating a layer called “background” and fill it with a dark color. I used #363636Step 3Let’s add some texture to our background. Duplicate the background layer and rename it “Texture.” Go to Filter > Noise > Add Noise, Amount: 60%, Distribution: Uniform, Monochromatic: Checked, Set the blending mode of the “Texture” layer to Overlay and opacity at about 15%.Step 4Now let’s add a gradient lighting effect to the background. Set your foreground color to white (keyboard shortcut: press “D” to reset foreground to black and background to white. Then press “X” to swap the two). Duplicate the “Texture” layer and rename it “Gradient.” Set the layer’s fill to 0%. Go Layer > Layer Style > Gradient Overlay, Blend Mode: Overlay, Style: Radial, Angle: 90, Scale: 117%, Set the gradient color to foreground to transparent (this is why we set our foreground to white). Set the blending mode of the “Texture” layer to Overlay and opacity at about 15%.Step 5Now let’s start on creating our dial buttons. Use the ellipse to create a small circle. This will be the outer shadow of the button so I named the layer “Button (Outer).” Mine is about 76 pixels. Set the layer’s fill to 0%. Go Layer > Layer Style > Bevel and Emboss, Style: Outer Bevel, Depth: 441%, Direction: Down, Size: 10px, Angle: 90; Altitude: 60; Global Light: Checked. Set the blending mode of the “Texture” layer to Overlay and opacity at about 15%.Now we have the outer part of our dial button looking something like this:Step 6Let’s create our inner button now. Duplicate the “Button (Outer)” shape and rename it “Button (Inner)”. Be sure you duplicate it so it appears in the exact same spot as our shadow button. You can do this by right clicking on the layer in the layers panel and selecting duplicate layer.If it’s not already, set the “Button (Inner)” shape layer’s color to the darker color we’ve been using (#363636) and set the fill opacity to 100%We should now have something like this:Step 7Now that we have our inner button in place, let’s adjust our layer styles to give it a more realistic look. First, we’ll start with the drop shadow of the “Button (Inner)” shape layer.Step 8Now let’s adjust the inner shadow of the “Button (Inner)” shape layer.Step 9Now we’ll adjust the inner glow of the “Button (Inner)” shape layer. This will give a little texture to our dial button.Step 10Now let’s change the bevel and emboss settings of the “Button (Inner)” shape layer. This is what gives our button a more realistic, three dimensional shape.Step 11Now let’s change the gradient overlay settings of the “Button (Inner)” shape layer. This gives our button a slight highlight on the bottom.Now, after adjusting all of those layer settings, we should have something like this:Step 12Let’s add our numbers and letters to the dial now. Simply use the type tool to create your number (I used 40pt Helvetica). Then, using the type tool again, create your letters (I used Helvetica 15pt Oblique).Step 13Now, let’s add a slight inner shadow to the layer styles of our number and letters.Group the button, number, and letters we’ve created into a groupNow, we should have something like this:ConclusionNow you can simply duplicate the group layer and change the numbers and letters as needed! You can use the final image as a reference to see what numbers correspond to which letters (if you don’t already have it memorized).You’ve just created a realistic telephone keypad using pure layer styles! Hopefully you can employ the skills you’ve learned here in future projects to help add a bit of realism to your design elements.